22 March 2020
Syntax highlighting Swift code for the web
Problem
I was writing an article for a company tech blog, hosted by Medium. This article was to introduce an open source iOS application architecture framework co-developed by myself as a part of my $job. In order to properly discuss and show how the framework is used, I needed to include a lot of Swift code samples.
Unstyled code blocks
At the time, the only option for adding blocks of code to a Medium article were to use an un-styled block of text. While that is fine for showing one-line Terminal commands, it’s a number of steps backwards for reading code.

Highlighted code blocks using embeds
Medium does offer an escape hatch by way of embedding any arbitrary content using the oEmbed mechanism - paste the URL of something you want to embed in an article, and Medium will faithfully render that content using an iframe in your article. The embedded content is pulled from the external URL in the web browser every time the article is viewed (there is some caching, fwiw). The price for this flexibility is a potentially degraded experience for readers - resizing embedded content as a page changes size can be janky; being dynamically fetched, the content can break or change if something happens with the 3rd party at any time after the article was written.
The options for embedding syntax highlighted source code in Medium are not great. You have to find a 3rd party that will provide the highlighting, enter your code snippet in that system, and then embed it into your article. Most people putting code in their Medium articles use GitHub Gists. The unfortunate downside to that is the GitHub attribution that appears at the bottom of every snippet. With any more than one or two code blocks, and your articly starts to look like an ad for GitHub.

Incomplete Swift syntax highlighting
Even with GitHub Gists, the highlighting of Swift syntax is incomplete. Not all keywords are recognized, and some newer (-ish) language features - like multi-line string literals are not properly highlighted.
Even client-side JavaScript libraries that offer Swift syntax highlighting are incomplete (highlightJS, Prism, etc.). I think mostly this boils down to these systems using token parsers which are largely regular expression based, as opposed to a system that can construct an abstract syntax tree (AST), or a language compiler. This is a fair trade-off for client-side highlighting since it needs to be fast.
Soft-wrapping
When Im looking at code, I want to see all of the code without having to scroll left/right. All code editors do this for you by soft-wrapping long lines of code so you can read it all. I have yet to see code on a web page be soft-wrapped - even on Apple’s developer site.
Solution - SwiftSnip
I decided to write my own version of GitHub Gist, specifically for the Swift language. I wanted a solution to the problems listed above, with the following requirements:
- Server-side rendering
- Beautiful syntax highlighting with full coverage of the Swift language (soft-wrapping as a stretch goal)
- Embeddable using oEmbed
Use Vapor to build a web app
Server-side Swift using Vapor allowed me to learn a lot about server-side Swift and Combine, and I got to use what I already knew about PostgreSQL, html, css, JavaScript to put together a complete service.
The service is hosted on Heroku, and uses an Ubuntu Docker image for the Vapor app, and nginx for handling http.
Use Apple’s swift-syntax
swift-syntax is the engine that Xcode uses to highlight Swift code (and is what SwiftLint & SwiftFormat also use). SwiftSnip uses swift-syntax to generate the most accurate syntax highlighting possible.
At a high level, SwiftSnip can be seen as a tokenizer, which takes source code as an input, and produces an array of [SwiftSnip-defined] tokens as its output. A token is used to identify every part of the input source code - from trivial whitespace to comments, literals, methods, declarations, etc. These tokens can then be transformed into something like HTML.

Within the SwiftSnip tokenizer, swift-syntax is leveraged to produce a SyntaxTree. That tree is then run through two passes: first to collect any new type symbols (e.g., structs, classes, etc.) that are declared in the input source code. Then, the syntax tree is visited once more to produce the list of tokens - using the list of declared type symbols to differentiate between external and internal types.

This is how the String type (i.e., an external symbol) can be highlighted differently from a type declared in the input source code (i.e., an internal symbol). For example, in the code below MyThing is considered to be an internal symbol, while String is considered an external symbol:
- struct MyThing: { }
- func foo(a: String, b: MyThing) { }
Implement html and css syntax highlighting
I had a number of needs for the final html + css:
- Copy / paste-able: I should be able to select some highlighted text, and a copy/paste should preserve everything about the raw code.
- Optional line numbers: I sometimes want to show line numbers, so I should have the ability to show / hide them on a case by case basis.
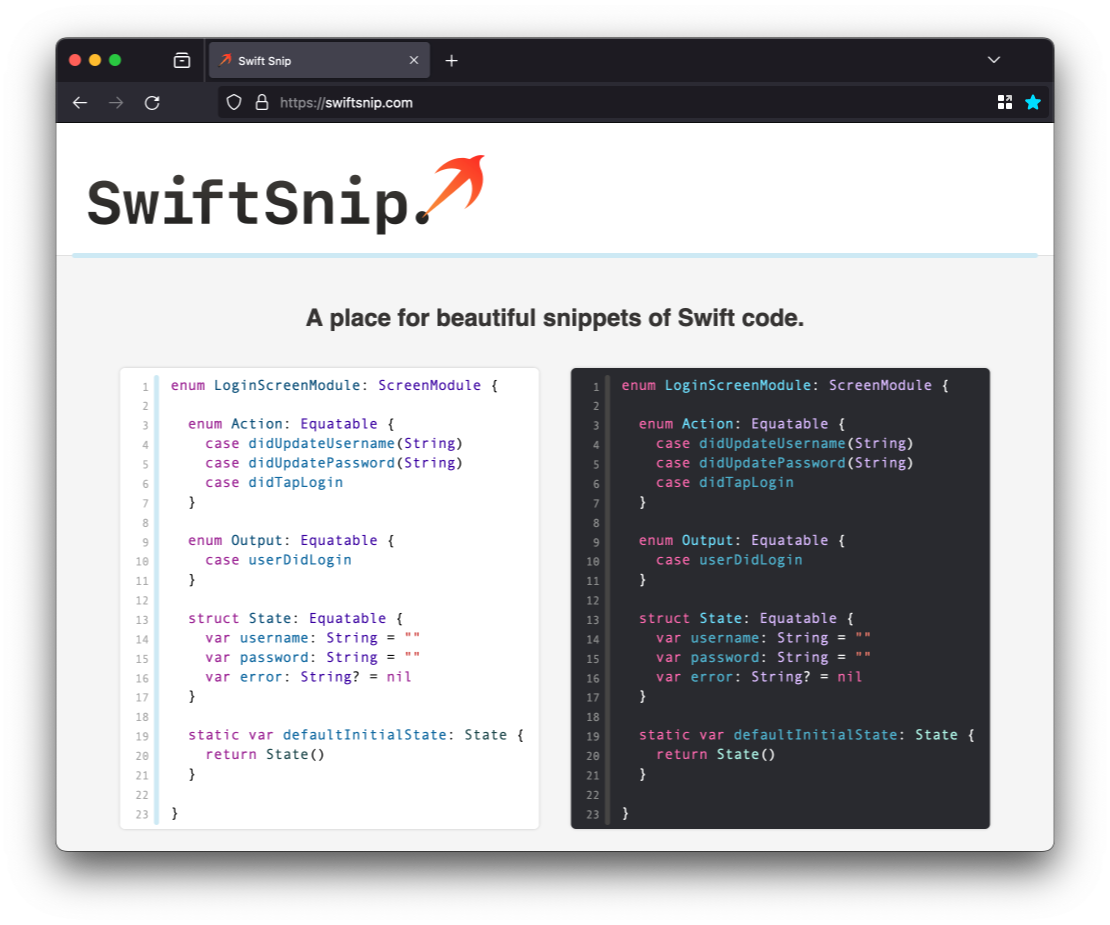
- Nice color scheme: My goal color scheme was the defaults that are in Xcode, and what appear on Apple’s developer website - in both dark and light mode.
- Soft-wrapping: This is my stretch goal of having the syntax highlighted final html + css behavive and look the same as it does in a code editor.
I spent a lot of time twiddling with various combinations of html and css over on CodePen, and came up with a (IMO) great solution that solves all of the above. View the CodePen here.
Enable embedding
The oEmbed mechanism is great for things like video players or audio players, where the hosted content is potentially large, and where the content size is fixed. Source code is light weight, and needs to flow with the rest of the page it is on. Unfortunately, it’s the only way to achieve the experience I want people reading my Medium article(s) to have.
Here are the articles published on the company’s tech blog that used SwiftSnip as an oEmbed provider:
- Lasso: Introducing a new architectural framework for iOS
- Lasso: An introduction to Flows
- Building a SwiftUI Weather App with Lasso, Part 1: Setup
- Building a SwiftUI Weather App with Lasso, Part 2: Adding the SwiftUI Views
Next steps
The next step is to productionize SwiftSnip for others to use. It uses login-with-GitHub currently, and you can import a Gist into SwiftSnip. This works well, and the editing tools inside the app allow you to enter new code and edit existing code as necessary.
The bigget hurdle is going to be re-architecting things a little bit so it can run at scale. Some corners were intentionally cut, because we needed the system in place in time to support the articles we were publishing for launching the Lasso framework.
The next phase of work will be around:
- UI polish for people “off the street”
- Proper caching of rendered snippets via CDN
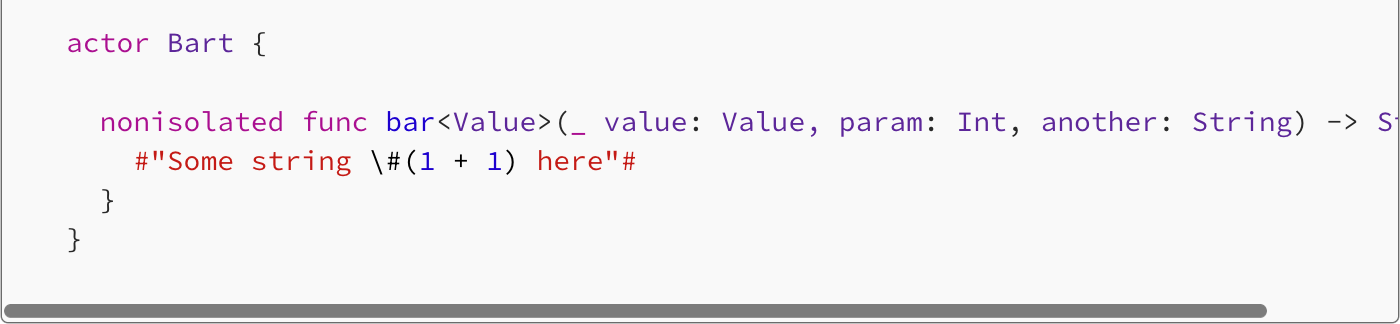
Update: Here’s a Swift code sample using the SwiftSnip highlighting - try resizing your web browser to see the soft-wrapping in action:
- /// Starts the process of refreshing a token.
- ///
- /// Changes `state` to `refreshing` with an empty set of waiters.
- private func startRefreshing(_ token: Token?, using work: @escaping @Sendable () async throws -> Token) {
- let task = Task {
- let result = await Result {
- try await work()
- }
- guard !Task
- return
- }
-
- switch result {
- case
- case
- }
- }
-
- self
- }
The above highlighted code is created using a static site generator that leverages SwiftSnip. Here’s a full example.